4.8. Out of Context Panels
Blender's new interface has Panels, most of which are called via the NKEY, appearing in the 3D Window or other window and performing actions which were in the Buttons Window of previous versions of Blender.
4.8.1. 3D ViewPort
Floating panels in the 3D Viewport Window.
4.8.1.1. 3D Viewport properties
This Panel is accessible via the 3D Window Menu View>>View Properties

Left to right and top to bottom:
4.8.1.1.1. Grid
Sets the distance between grid lines (in Blender units, 1.0 by default)
4.8.1.1.2. GridLines
The number of grid lines to show in rotated 3D views.
4.8.1.1.3. Lens
A 'zoom factor' similar to Camera Lens value. Has a meaning only in perspective view.
4.8.1.1.4. ClipStart, ClipEnd
Start and End of the clip region for the 3D Viewport Window, works like Camera ones.
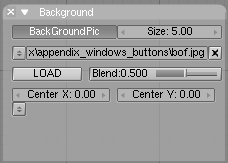
4.8.1.2. Background
This Panel is accessible via the 3D Window Menu View>>Background Image. Many of these buttons appear only if the context allows them.
Left to right and top to bottom:
4.8.1.2.1. BackGroundPic
This option displays/hides a picture in the background of the 3DWindow. Standard Image blocks are used; re-using an Image does not consume any additional memory. The BackGroundPic is only drawn in ortho and Camera view. It is always centered around the global nulpoint. In camera View, it is completely displayed in the viewport.
4.8.1.2.2. Size:
The size in Blender units for the width of the Background Pic. Only of interest in ortho.
4.8.1.2.3. Image Menu
Select an existing Image from the list provided.
4.8.1.2.4. LOAD
The Window changes into an Image Select Window. Use this to specify the picture to be used as the Background Pic. The picture is added to the Blender structure as an Image block.
4.8.1.2.5. Blend
The factor with which the grey of the 3DWindow is blended with the background picture.
4.8.1.2.6. Center X, Center Y
Allows for an offset of the Background Pic, making it not centered in the origin any more.
4.8.1.2.7. TextureBrowse
Specify a Texture to be used as the Background Pic. This only works for Image Textures. The TextureButtons have extensive options for an animated Image Texture, which allows you to achieve an animated BackGroundPic. Use this option for rotoscoping, for example. This is a technique in which video images are used as examples or as a basis for 3D animation.
4.8.1.3. Transform Properties
This Panel is accessible via NKEY in the 3D Window.

Left to right and top to bottom:
4.8.1.3.1. OB:
The current Object name.
4.8.1.3.3. LocX, LocY, LocZ
The position of the Object center.
4.8.1.3.4. RotX, RotY, RotX
The three Euler rotations of the Object.
4.8.1.3.6. Vertex X, Vertex Y, Vertex Z
The three coordinates of the selected vertex, or of the median point of the selected vertices, if any.
4.8.2. IPO Window
Floating panels in the IPO Window.
4.8.2.1. Transform Properties
This Panel is accessible via NKEY.

Left to right and top to bottom:
4.8.2.1.1. Xmin, Xmax, Ymin, Ymax
The numbers in these buttons specify the boundbox of all the visible curves in the IPO Window. Use the buttons to enter a new value.
If in Edit Mode:
4.8.2.1.2. Speed, SET
In certain cases, the exact speed of a translation caused by Object IPOs must be determined. Proceed as follows to do this:
In the IPO Window, make only the LocX, LoxY, LocZ (or any other congruent set of 3) curves visible.
Set the IPO Key option ON (KKEY in the IpoWindow).
Select the keys that must be assigned a particular speed.
Set the speed. Only keys that already have a speed and direction can be changed, this means that the handles of the IPO of the selected Key must not be horizontal. If the speed is 0.0, nothing happens.
Press the Set Button.
4.8.2.1.3. Vertex X, Vertex Y
The two coordinates of the selected vertex, or of the median point of the selected vertices, if any.