15.2. Relative VertexKeys
Relevant to Blender v2.31
Relative Vertex Keys (RVK) works differently inasmuch only the difference between the reference mesh and the deformed mesh is stored. This allows for blending several keys together to achieve complex animations.
We will walk through RVK via an example.
We will create a facial animation via RVK. While Absolute Vertex Keys are controlled with only one IPO curve, Relative Vertex Keys are controlled by one interpolation curve for every key position, which states 'how much' of that relative deformation is used to produce the deformed mesh. This is why relative keys can be mixed (added, subtracted, etc.).
For facial animation, the base position might be a relaxed position with a slightly open mouth and eyelids half open. Then keys would be defined for left/right eye-blink, happy, sad, smiling, frowning, etc.
The trick with relative vertex keys is that only the vertices that are changed between the base and the key affect the final output during blending. This means it is possible to have several keys affecting the object in different places all at the same time.
For example, a face with three keys: smile, and left/right eye-blink could be animated to smile, then blink left eye, then blink right eye, then open both eyes and finally stop smiling - all by blending 3 keys. Without relative vertex keys 6 vertex keys would have needed to be generated, one for each target position.
Consider the female head in Figure 15-4:
To add an RVK just press IKEY and select Mesh as for AVK, but, from the pop up menu select Relative Vertex Keys. This stores the reference Key which will appear as an yellow horizontal line in the IPO window.
Relative keys are defined by inserting further vertex keys. Each time the IKEY is pressed and Mesh selected a new horizontal line appears in the IPO window. If frame number is augmented each time the horizontal lines are placed one above the other. For easier modelling let's hide all vertices except those of the face (Figure 15-5).
Now move to another frame, say number 5, and add a new Key. A cyan line will appear above the yellow, which now turns orange. Switch to Edit mode and close the left eyelid.
When you are done exit from Edit Mode. If you select the reference key you will see the original mesh. If you select your first RVK you will see the deformed one (Figure 15-6).
Repeat the step for the right eye. Beware that the newly inserted key is based on the mesh of the currently active key, so it is generally a good idea to select the reference key before pressing IKEY.
Then add a smile (Figure 15-7).
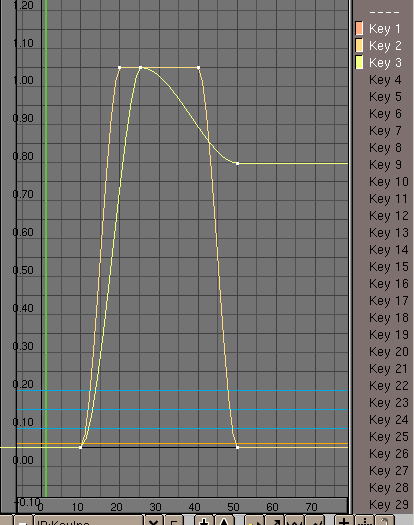
Your IPO Window will look like Figure 15-8.
The vertical order of the Vertex Keys (the blue lines) from bottom to top determines its corresponding IPO Curve, i.e. the lowest blue key line will be controlled by the Key1 curve, the second lowest will be controlled by the Key2 curve, and so on.
No IPO is present for the reference mesh since that is the mesh which is used if all other Keys have an IPO of value 0 at the given frame.
Select Key1 and add an IPO with your favourite method. Make it look like Figure 15-9.
This will make our mesh undeformed up to frame 10, then from frame 10 to frame 20 Key 1 will begin to affect the deformation. From frame 20 to frame 40 Key 1 will completely overcame the reference mesh (IPO value is 1), and the eye will be completely closed. The effect will fade out from frame 40 to frame 50.
You can check with ALT-A, or by setting the frame numbers by hand. The second option is better, unless your computer is really powerful!
Copy this IPO by using the down pointing arrow button in the IPO Window toolbar (Figure 15-10). Select the Key 2 and paste the curve with the up pointing arrow. Now both keys will have the same influence on the face and both eyes will close at the same time.
 | Panning the Toolbar |
|---|---|
It may happen that the toolbar is longer than the window and some buttons are not shown. You can pan horizontally all toolbars by clicking MMB on them and dragging the mouse. |
Add also an IPO for Key 3. Let's make this different (Figure 15-11).
This way the eyes close and she begins to smile, smile is at maximum with eyes closed, then she smiles 'less' while the eyes re-open and keeps smiling (Figure 15-12).
The IPO Curve for each key controls the blending between relative keys. These curves should be created in the typical fashion. The final position is determined by adding all of the effects of each individual IPO Curve.
 | RVK in Action Window |
|---|---|
You can operate with RVK also in the Action (SHIFT-F12), not IPO, Window (Figure 15-13). The influence of any Key is given via a slider. Marks are present at Key points (i.e. where the IPO would have a control point). |
 | Values out of [0,1] range |
|---|---|
An important part of Relative Keys is the use of additive or extrapolated positions. For example, if the base position for a face is with a straight mouth, and a key is defined for a smile, then it is possible that the negative application of that key will result in a frown. Likewise, extending the IPO Curve above 1.0 will "extrapolate" that key, making an extreme smile. |


