Chapter 22. Volumetric Effects
Relevant to Blender v2.31
Although Blender exhibits a very nice Mist option in the World Settings to give your images some nice depth, you might want to create true volumetric effects; mists and clouds and smoke which really looks like they occupy some space.
Figure 22-1 shows a set-up with some columns placed in a ring, with some nice materials of your choice for the columns and soil, and a World defining sky color.

Figure 22-2 shows the relative rendering, whereas Figure 22-3 shows a rendering with Blender's built-in Mist. Mist setting in this particular case are: Linear Mist, Sta=1, Di=20, Hig=5.


But we want to create some truly cool, swirling, and most importantly, non-uniform mist. Blender's built-in procedural textures (clouds for example) are intrinsically 3D, but are rendered only when mapped onto a 2D surface. We will achieve a 'volumetric'-like rendering by 'sampling' the texture on a series of mutually parallel planes. Each of our planes will hence exhibit a standard Blender texture on its 2D surface, but the global effect will be of a 3D object. This concept will be clearer as the example proceeds.
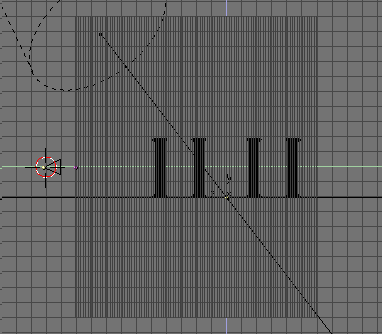
With the camera at z=0, looking forward, turn to front view and add a plane in front of the camera, with its centre aligned with the camera's viewing direction. In side view move the plane where you want your volumetric effect to terminate. In our case somewhere beyond the furthest column. Scale the plane so that it encompasses the whole of the camera's field of view (Figure 22-4). It is important to have a camera pointing along the y axis since we need the planes to be orthogonal to the line of sight. Anyway, we will be able to move it later on.

After having checked that we're at frame 1, let's place a Loc KeyFrame (IKEY). We should now move to frame 100, move the plane much nearer to the camera, and set another Loc KeyFrame. Now, in the Object Context Anim Settings Panel (F7) Press the DupliFrame button.
The 3D window, in side view, will show something like Figure 22-5. This is not good because the planes are denser at the beginning and end of the sweep. With the plane still selected change a window to an IPO window (SHIFT-F6). There will be three Loc IPOs, only one of which is non-constant. Select it, switch to Edit Mode (TAB) and select both control points. Now turn them from smooth to sharp with (VKEY) (Figure 22-6).


The planes will now look as in Figure 22-7. Parent the DupliFramed planes to the camera (select the plane, SHIFT select the camera, CTRL-P). You now have a series of planes automatically following the camera, always oriented perpendicularly to it. From now on you could move the camera if you so wish.

Now we must add the Mist material itself. The material should be Shadeless and cast no shadows to avoid undesired effects. It should have an small Alpha value (Figure 22-8). A material like this would basically act like Blender's built in mist, hence we would have no advantage in the resulting image. The drawback is that computing 100 transparent layers is very CPU intensive, especially if one desires the better results of the Unified Renderer.
 | Quick previews |
|---|---|
You can use the DupOff: Num Button in the Anim Settings Panel to turn off some of the planes and hence have a faster, lower quality preview of what you are doing. For the final rendering you will then turn DupOff back to 0. Pay attention to the Alpha value! The fewer planes you use the thinner the mist will be, so your final rendering will be much more 'Misty' than your previews! |
The truly interesting stuff comes when you add textures. We will need at least two: One to limit the Mist in the vertical dimension and keep it on the ground; The second to make it non-uniform and with some varying hue.
As a first texture Add a Blend texture of "linear" type, with a very simple colorband, going from pure white, Alpha=1 at a position 0.1 to pure white, Alpha=0 at a position 0.9 (Figure 22-9). Add this only to the Alpha channel and as a multiplying (Mul Button) texture (Figure 22-10). To make our mist consistent as the Camera moves, and the planes follow, we have to set it Global. This will be true also for all other textures and will make the planes sample a fixed 3D volumetric texture. If you are planning an animation you will see a static mist, with respect to the scene, while the camera moves. Whichever other texture setting would show a Mist which is static with respect to the camera, hence being always the same while the camera moves, which is highly unrealistic.


Anyway, if you want to have a moving, swirling, changing mist you can do so by animating the texture, as will be explained later on.
The Blend texture operates on X and Y directions, so if you want it to span vertically in the Global coordinates you will have to remap it (Figure 22-10). Please note that the blending from Alpha=1 to the Alpha=0 will occur from global z=0 to global z=1 unless additional offsets and scalings are added. For our aims the standard settings are OK.
If you now do a rendering, it doesn't matter where your camera, and planes, are. The mist will be thick below z=0, non-existent above z=1 and fading in between. If you're puzzled by this apparent complexity, think of what you would have got with a regular Orco (ORiginal COordinate) texture and non-parented planes. If you had to move the camera, especially in animations, the results would become very poor as soon as the planes were no longer perpendicular to the camera. You'd end up with no mist at all if the camera were to become parallel to the planes!
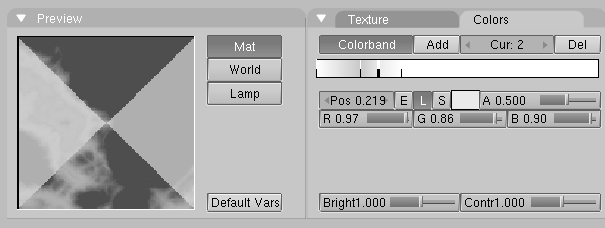
The second texture is the one giving the true edge on the built-in mist. Add a Cloud texture, make its Noise Size=2, Noise Depth=6 and Hard Noise On (Figure 22-11). Add colorband to this too, going from pure white with Alpha=1 at Position 0 to a pale bluish-grey with Alpha=0.8 at a position of about 0.15, to a pinkish hue with Alpha=0.5 around position 0.2, ending in a pure white, Alpha=0 colour at position 0.3. Of course, you might want to go to a greenish-yellow for swamp mists etc.
Use this texture on both Col and Alpha as a Mul texture, keeping all other settings as default. If you now render the scene the bases of your columns will now be masked by a cool mist (Figure 22-12). Please note that the Unified Renderer gives much better results here.

 | If you are planning an animation and want your Mist to be animated as if it were moved by wind, it is this latter texture you must work on. Add a Material texture IPO, be sure to select the correct texture channel and add some IPO to the OfsX, OfsY and OfsZ properties. |